How To Install a Whirlpool® Water Softener
Whirlpool® systems are powerful, yet easy to install. See how DIY water softener installation can be accomplished — even if you lack previous plumbing experience.

Quick Installation Checklist
Water Softener Installation Savings and Considerations
If you’re prepared to take on a bit of handiwork, the cost to install a water softener is less than a professional installation. Eliminating the cost of labor means that the price largely depends on the capabilities of your water softening unit, which is measured in grains. Typically, the higher the grain count, the higher the water softener cost.
The number of people in a household provides a basis for the minimum number of grains you should be looking for in your next unit:
1–4 People: ~30,000 grains minimum
5–6 People: ~40,000 grains minimum
Another factor that may affect the final price of your DIY water softener project is the ease of installation. If the pre-plumbing for your water softener is conveniently located near the equipment itself, you can save time and money eliminating the need for additional plumbing.
Planning your budget and want to know exactly how much it will be to install your water softener? Check out our selection of products to find the ideal unit for your needs.
Water Softener DIY Installation Made Simple
Installing a water softener yourself allows you to work on the project at your own pace and without spending extra money on a plumber. If you’re simply replacing an old water softener, this can be done in under an hour. A new installation does require some additional plumbing knowledge, but can be tackled in a few hours. You’ll want to make sure you have all the necessary supplies and tools before you begin, as you may need to cut some pipes to align your water softener and water supply lines. Creating a detailed checklist before you begin, will ensure you don’t miss any steps.
Before You Get Started
- Two 1” NPT female connectors and enough tubing to connect from the water softener to your existing plumbing. You may have copper, PVC, CPVC, steel or PEX plumbing. Each of these plumbing types may require different materials and different tools for installation.
- A drain is necessary for the regeneration or recharge process. 12 feet of drain tubing is supplied but if your drain is further than 5 feet away, you will need to purchase enough ½” tubing to reach your drain. The drain should not be more than 30 feet away from the softener and the drain line should not be elevated more than 8 feet above the floor.
- The power cord (transformer) needs to be plugged into a 110V continuous live outlet. The unit comes with a 10 foot power cord.
Where To Install Your Water Softener
If you’re asking where a water softener goes, it’s time to do a bit of investigating around your home. On the other hand, if you have a general understanding of how to plumb a water softener, you can quickly identify the most effective location.
If you’re installing a whole-home system, you’re going to want to place the softener as close as possible to the entry point for water in your home. As a general rule, it’s best to place a water softener at the earliest possible point in your home plumbing system. That means installing your water softener somewhere it can feed into your water heater, rather than placing it downstream from this equipment. Not only will you prevent hot water from damaging your softener, but you will also extend the life of your water heater by feeding it softer water.
Every installation scenario is different, but some general plumbing requirements for installation include:
- 3 gallons per minute at the inlet
- 125 PSI maximum water pressure
Your water softener will need power to function, and general water softener electrical requirements include:
- A 120V, 60 Hz grounded outlet with circuit breaker protection
- If using an extension cord, ensure that it is a #20AWG appliance replacement cord
Wondering how to install a water softener with a well? As long as the water source enters your home in the same fashion as a municipal water supply, the installation steps are identical.
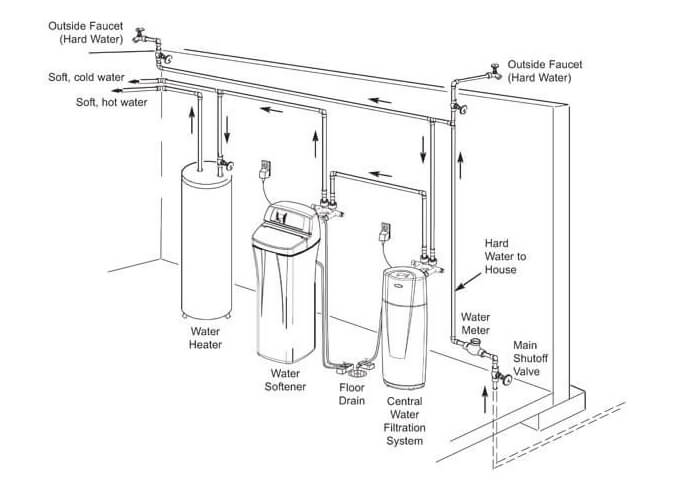
Typical Basement Installation
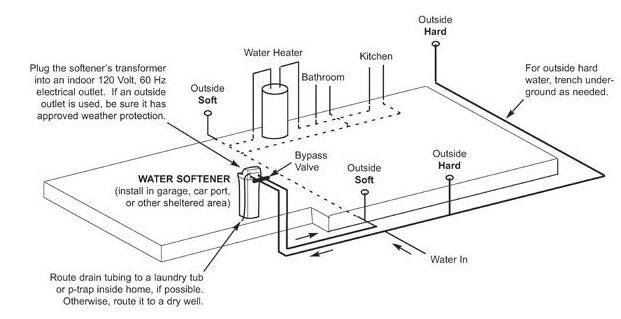
Typical Slab Foundation Installation
Installation Video
Whirlpool® Water Softeners
From negatively affecting your plumbing and water-using appliances to drying out your skin and hair, hard water is a problem you can address for the long term with Whirlpool. Identify the right solution for your home.
Compare Water Softeners
Explore the Full Whirlpool Lineup. Available at Lowe’s
Shop NowFind Whirlpool® Product Manuals
Locate everything you need to know about your specific water softener in the product manual. From installation guidance to warranty information, Whirlpool® has you covered.
View Product Manuals